Nature Connection: Nature Weaving.
Weaving makes up a lot of our world. It’s how textiles are formed, and even how buildings stay together. The understanding and design involved with materials is both explorative and wise. The unique art of “nature weaving” — weaving with nature’s materials — is a simple, seasonal and local activity to try. For adults and children alike, it’s a space for experimentation and play.
This blog introduces you to a personal approach to this nature connection activity of nature weaving.
What is weaving?
Weaving is a method of textile production that uses a warp (longitudinal) and weft (latitudinal) to create a durable piece of cloth. The cloth’s appearance and application is dependent on what a) yarns you use, on b) the type of loom you use, and on c) the chosen weave structure.
Other methods to create cloth are knitting (t-shirts and jumpers) which gives a natural elasticity, and non-woven processes (felt, rubber) that are more like a sheet of fibres or substances bonded or interlocked together. Woven cloth has a wide variety of applications.
Weaving is an under-over-under-over affair, with the warp being the stable yarn, and the weft being the moving yarn. Dependent on how many unders and how many overs you do will determine the structure and pattern of the textile.

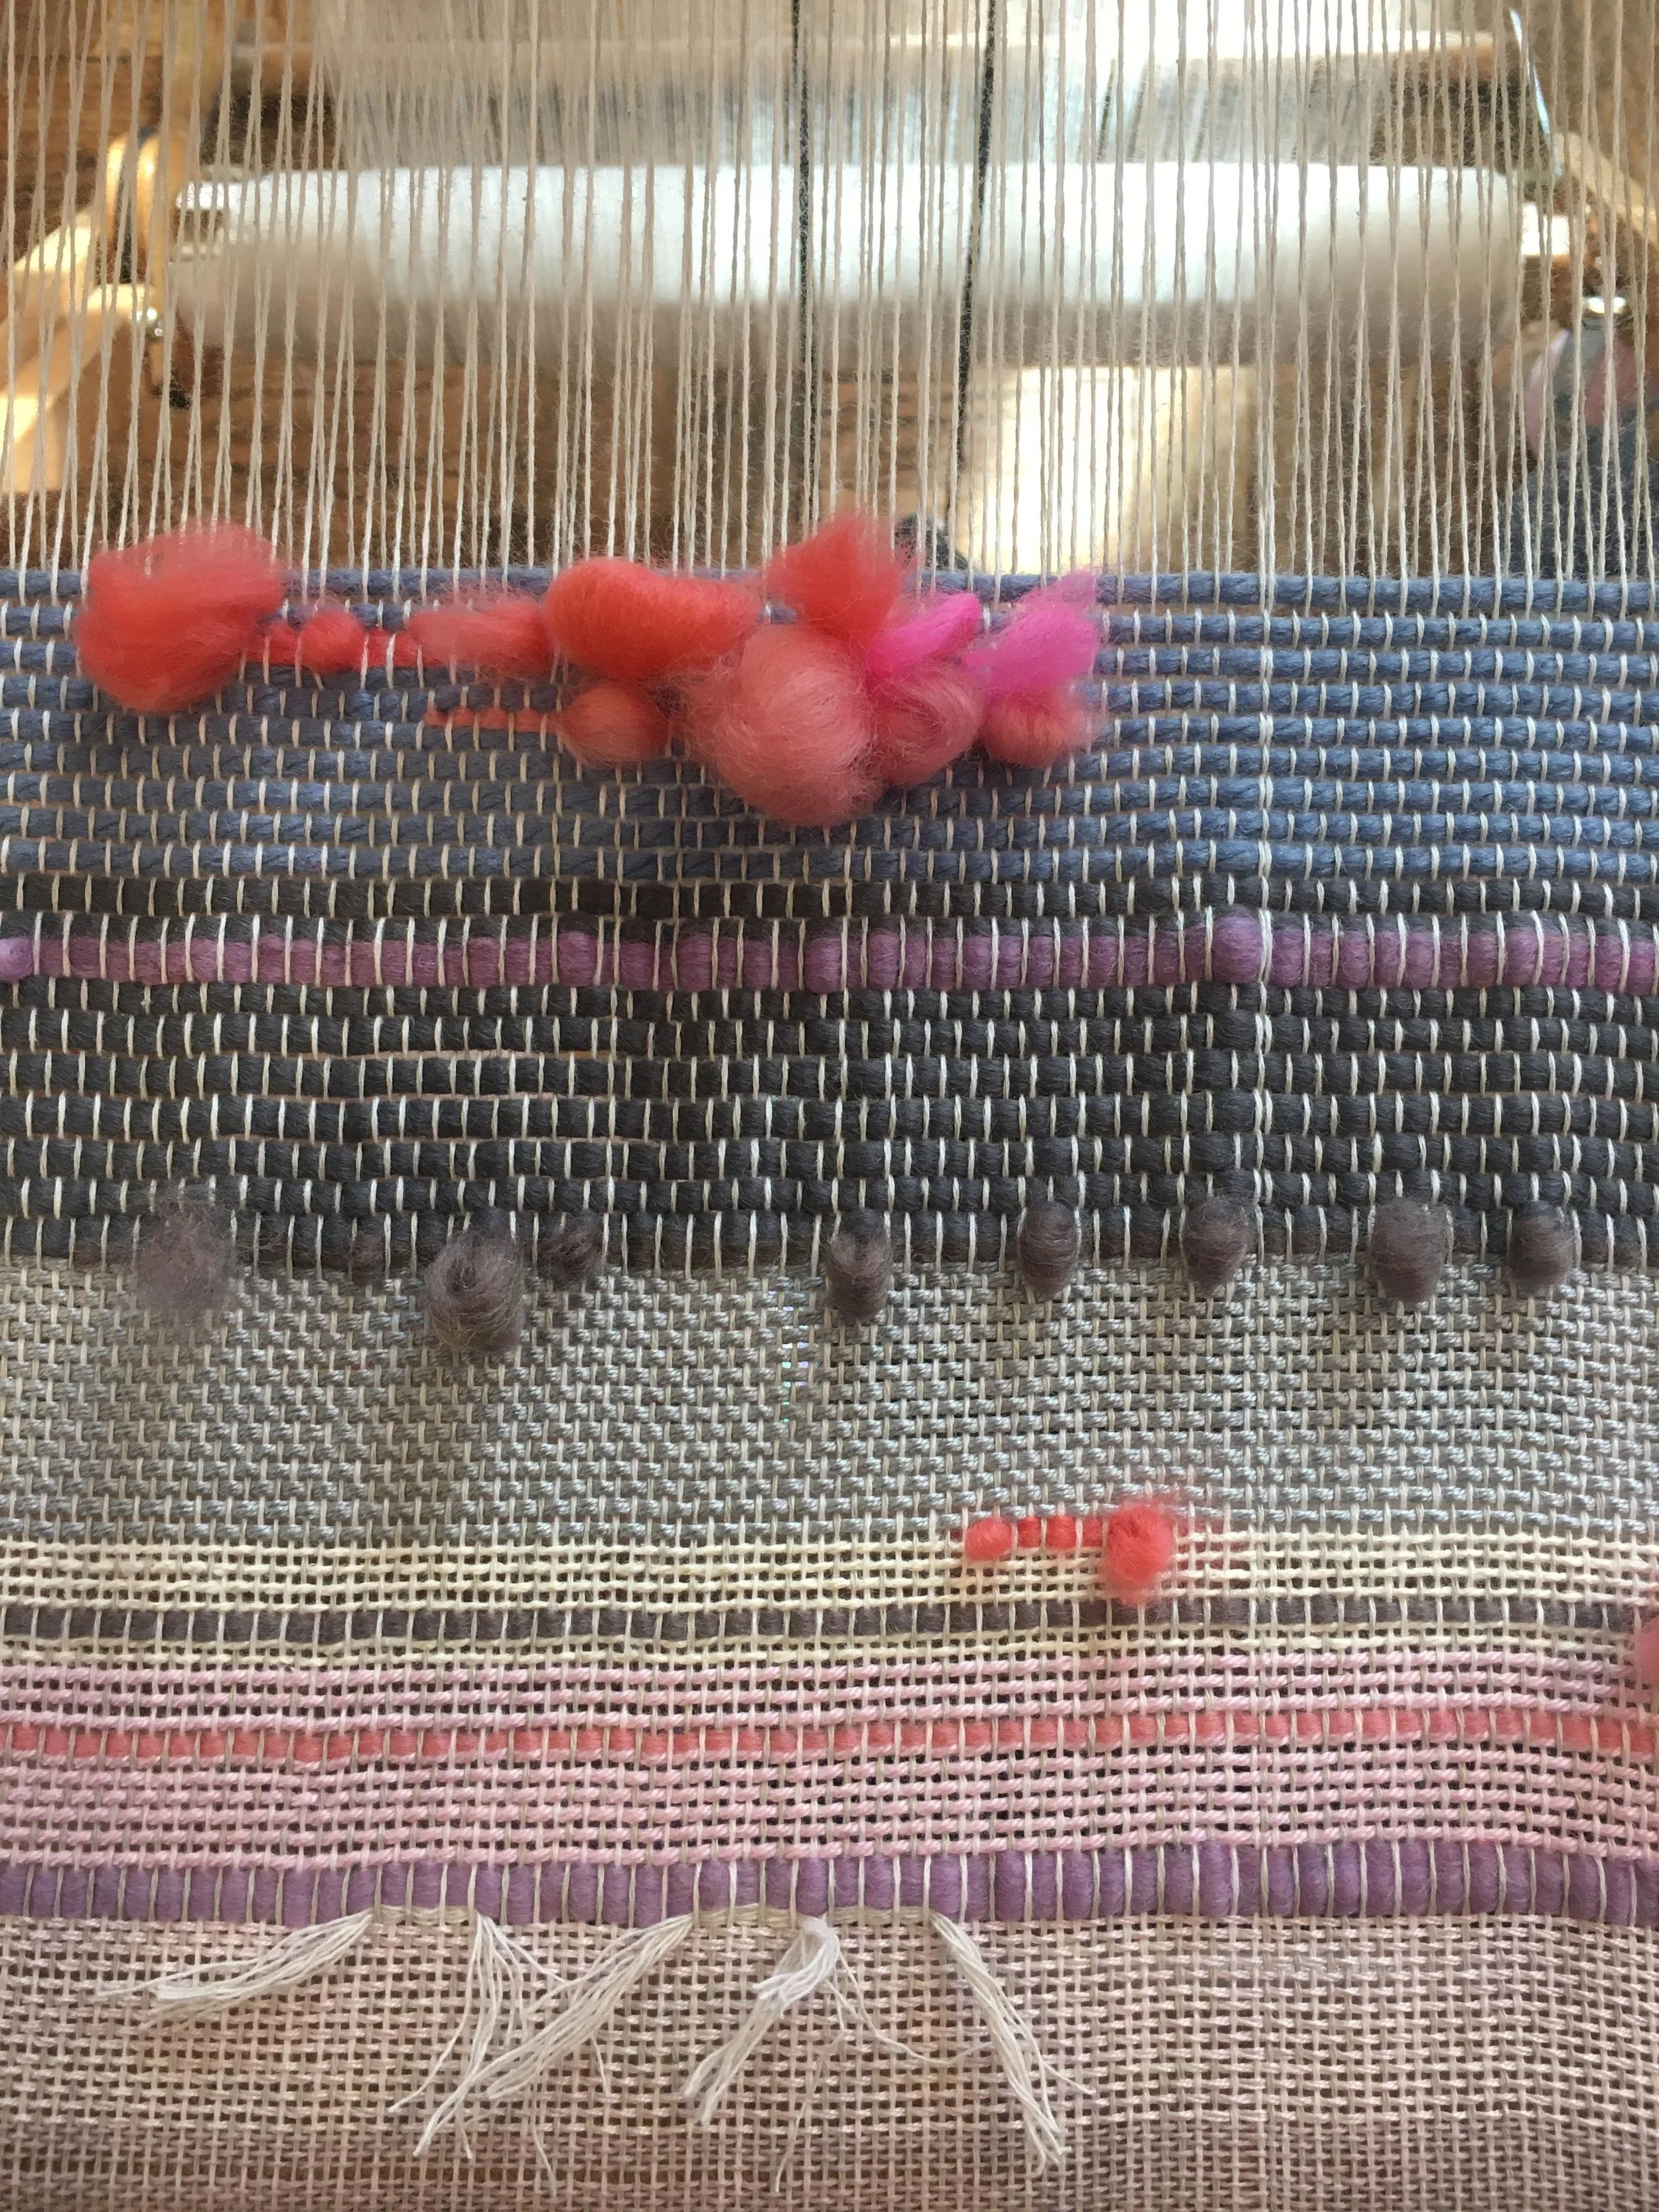

Images: The tight warp of a traditional wooden floor loom with some chosen yarn varieties, and close-ups of the plain weave structure when using different yarn thickenesses and wool rovings.
What is nature weaving?
‘Nature weaving’ is taking the principle, process and structure of weaving for textiles, although using ready-to-go materials found in nature instead. This can be in the form of the loom you use, or the materials that you weave with (in place of yarn).
While you can explore nature weaving using ready-made yarns that would normally be used for creating a fabric, the typical activity of nature weaving encourages you to utilise unconventional yarns, such as grasses and stems. Your loom — the frame used to attach the warp to — can be built using branches, rather than a pre-made bought tool. The materials can be dried or fresh, depending on what you want your piece to look like (think colours and pliability, which we’ll come to further down). Most often, you will warp your loom using ready-made yarns or string so that there is tension and structure, and then weave your nature materials as the weft.
Weaving generally requires conformity to certain principles — plus knowledge and practice. You need your warp and you need your weft, and how you design your connection of these two will create various fabrics. Nature weaving allows you to recognise these principles — and subsequently understand how many textiles are made — while using stuff to hand and without very much skill needed.
It can be a quick activity, it can be something more lengthy. It can be super experimental with no specific thought, or it can be mindful and composed. This all depends on how you approach the activity, and so it is suitable for many groups of people.
Location is also important. The majority of nature weaving workshop leaders you find will ensure you’re out in the nature that you’re weaving with. It’s not always possible, for instance on wet days, but being placed in a space where you can access the feeling of nature, plus its materials, will immerse you more into the activity. This is where nature weaving becomes more of a nature connection activity than something purely crafty.


Images: 1. Foraged materials from nature, including branches, grasses, stems and flowers, along with scissors and perle yarn for warping; 2. Examples of woven nature using branch looms, experimental looms, self-warping and cardboard looms; 3. A traditional lap loom finished project and a variety of alternative materials.
How do you forage?
Foraging best practice.
First up, consider your foraging best practice.
⇾ 1. Take only as much as you need.
The primary rule for foraging is to only take as much as you need, and maybe even less than that.
Nature weaving is wonderful in how experimental it is. It doesn’t inform that you need only a specific type of plant, and so depending on your location and season, you’ll be able to access all sorts of plant materials — and that means you don’t need abundance of anyone variety. Some plants are better than others, such as grasses for building up a large piece or as a background, and usually this is a plant in abundance. However, adding colour or character may involve flowers, so in this instance remember why the plants have flowers — for attracting pollinators, for warning off predators, and for reproduction. So be careful with how much you take, and recognise why you are taking it. Consider your purpose, your composition, your application.
⇾ 2. Know what it is you’re foraging.
Arguably, the primary rule of foraging is actually to know what it is you’re foraging, but to me, you first need to know what you’re going to do with the plant material before you can assess how much there is of it and subsequently how much of it you can take. So perhaps this is first or second on your foraging best practice list, but either way, be able to identify — at least in some manner — what it is you’re about to forage.
This is a rule whether you are foraging for food, for dyestuffs, for printing material, for weaving material… don’t go sticking your hands into and onto plants (even with gloves) unless you can ascertain that it is safe to do so. Look to the plant for clues; if it’s spiky then don’t go rushing in. If it’s a super tall hogweed with serrated leaves, don’t touch it. If it’s a parsley with a spotty red stem, don’t eat it.
This marries with the above point of not taking materials unless you can visualise what you may do with it. The activity of nature weaving does improve knowledge around how certain plant materials feel and how useful they are for particular compositions, so until you start, it can be difficult to acknowledge what you should use. However, there are certain plants you’ll have innate wisdom over, such as knowing fresh dandelion stems are soft, while dried grasses would be stiff.
⇾ 3. Be prepared with harvesting tools.
Carry some snips or sharp and clean secateurs, along with gloves, plastic or paper baggies, and a pen for labelling. I can’t go for a walk, run or cycle anymore without having my eyes peeled for plant material, especially in summer. Even if I’m not ready to harvest there and then, I’ll make a note of what I’ve seen and where, how abundant the plant is, how easy it is to access, and what I would use it for.
When you are harvesting, ensure clean sharp cuts (to reduce the risk of pathogens getting in to the plant wound) or use your fingernail to pop flowers off. You are essentially breaking off a plant’s limb, so go gently.
⇾ 4. Don’t go on private land without permission.
I do sometimes use the sneaky rule of foraging whatever is hanging over a fence from someone’s front garden (if it’s either abundant and/or dying back, and I only take what I can use). And generally in parks I’ll harvest the “wild” plants. However, I wouldn’t go into someone’s drive or garden, or go to the fenced off spaces in green spaces.
I live in an urban environment so there is an abundance of wild and cultivated plants to choose from, but even in rural places there can be villages planted up nicely, and so realistically you simply need to consider rule number 1 again. Previously I’ve spotted flowers that need dead-heading, with the material useful to me in some textile craft, yet because they’re in a private garden or council parklet it can feel tricky regarding permission.


Images: 1. Some dandelion stems post-flowering in the pavement that can be respectfully harvested; 2. Some frilly and smooth bits by a park pond, including yarrow and reeds; 3. A workshop participant foraging the tips of leaf stems from a tree overhanging onto the pathway; 4. A couple plastic bags of fresh but not wet foraged materials.
Nature weaving material top tips.
So when it comes to nature weaving, here are some tips:
☉ Dried materials can be just as effective as fresh materials, though the appearance and handling will be different. For instance, dried materials are not as malleable or will break easily and have the muted autumnal shades. Fresh materials are easier to handle, but as they dry will still fade in pigment (e.g. green to yellow) and shrivel slightly.
☉ Grasses are the most straightforward for creating blocks of weave. They’re abundant and have degrees of interest depending on the species; stems with fluffy ends can be woven to have the decorative bit hang over, and you’ll achieve an ombre of green/yellow hues throughout the weave.
☉ Flowers will of course give a vibrant pop of colour and depth of ornament to a piece, but will need to be placed into the weave rather than woven themselves. Often then, the flowerheads are added once you have your background.
☉ Spiky plants will likely get stuck on your warp, particularly if you have used a ready-made yarn or your warp is close together. If you’ve gone for a self-made loom, your spiky plant would probably be too deep to work here (flatter is better). However, spiky bits such as holly leaves can afford interest; these can be placed inside a bit of your weave once woven, or you could even stitch them on.
☉ You don’t want fresh materials to be wet; they won’t glide through your warp, will retain moisture that could spread to the warp threads, and will generally be harder to manoeuvre. Don’t harvest on a wet day for this reason.
☉ Consider your composition before you harvest; what colours are you likely to get? are you going for something bold or fine? Sure, weaving is about experimenting and connecting in the moment, but if you can surmise the outcome, this will help in foraging choices.
☉ That being said, a reminder that fresh materials will fade and will dry, so the outcome you envision will always be slightly different, even if you stick with only evergreen plants!
☉ Use it as playtime, but record what works and what doesn’t; what season; what the weather was doing when you harvested; what was the foraging location like; what were the other materials like that you used.


Images: 1. A workshop participant choosing to forage only dried and dead materials in muted hues; 2. Workshop participants searching for their preferred fresh materials in street planting; 3. Workshop participants carefully composing their branch looms and experimenting with different textures; 4. A workshop participant chose to use a lot of flowers for an ornamental colourful vibe.
Using other materials.
There are plenty of natural-based materials to use to heighten the textures and colours of your piece. In fact, you could also use found plastic materials, as I once did with some caution tape. Here are some examples:
Yarns — all sorts of thicknesses, textures, colours, fibre types
Wool rovings and fleece, cotton lint, flax tow — fluffy, easily pokeable through the piece
Found plastics — carrier bags that you cut into strips, random objects that you attach on


Images: 1. A selection of string, naturall-dyed cotton yarns, drawstring cords, flax tow, wool rovings and paper yarn; 2. Materials laid out on a blanket during a forest workshop; 3. Saving bindweed to use as yarn by wrapping it around a branch to dry; 4. A workshop participant experimenting with an experimental branch piece using string.
Nature Weaving Workshops in London
*
Nature Weaving Workshops in London *
What types of loom can I use?
So long as you are following the under-over-under-over technique, with alternating passes of your weft under and over the warp, then you will be creating a woven material. But your loom will provide structure or intrigue to your piece and will determine how you go about the process of weaving.
Cardboard loom.
Handy for on-the-go or with kids, and it could even make a fun greetings card (imagine it with holly, dried orange and pine for a festive gift!) It is ultimately free, because everyone receives cardboard with packages or as cereal boxes — and those colours and textures can also be part of the fun.
Snip as many notches as you like, bearing in mind that the closer the notches are together, the higher likelihood of the card ripping, and also that the longer the notches are the less space for weft there’ll be.
And then warp it as a normal loom — start by warping one thread and tying it to itself on the cardboard back, then continue the winding whilst paying attention to your tension (there’s more chance of it ripping here too, so take it easy).
Jute twine or string is a straightfoward warp thread. Weave thin or flat materials to create something more tightly woven, or simply place in leaves and flowers to create something more abstract.


Images: 1. Cardboard saved from deliveries can offer additional interest such as the colours, patterns and thickenesses; 2. This participant decided to switch the direction of their warp and weft (the warp became latitudinal instead of longitudinal); 3. A workshop participant using only 5 warp threads but still creating a full piece; 4. An example of a cardboard loom with narrower warp creating a more rectangular piece.
Self-warped loom.
This one can be fiddly. You are using only soft foraged materials to make the edge, unlike other looms where you have something solid for a frame. Once you have selected your warp ‘yarns’ (grasses, thin reeds, or typical yarns could still be used), you will need to sticky tape your warp down (onto a chopping board or table).
Once secure, you weave as normal with the in-out-in-out weft process. However, consideration for the dryness and stiffness of your materials may be required - if a material won’t bend around a warp ‘yarn’, it may be best to leave it sticking out the side.
Best for grasses, reeds, Norwegian flax, day lilies… things that dry well and can be revived, or are flat and malleable enough to fold.


Images: 1-2. Starting a self-warped loom using some fresh cordyline stems stripped into thinner bits, and weaving tightly with various grasses; 3. A community member with their dried palm self-warped piece; 4. Example of a fresh self-warped piece next to an older dried piece.
Branch loom.
Using similar thickness and length branches, create a square or rectangle, and tie tightly at each corner (you can go wild and choose a pop colour even). This forms the loom frame, and gives a solid base from which to manoeuvre your materials - it is generally held in the lap, but a table or floor can give further stability.
Warping is best done in stages, with each warp yarn being separate. Normal looms would allow you to snake around notches, which is what you do for the cardboard loom. To have separate warp threads, you have two options:
Measure the loom height, add on around 10cm, and then double; cut your thread lengths to this amount according to how many warp strands you require on your loom e.g. your warp length is 30cm, add 10cm for tying, then double = 80cm each warp strand.
Measure the loom height, add on around 20cm for tying.
Option 1 provides you with a thicker warp with two noticeable threads, but allows you to simply loop over the top and tie at the bottom (known as a girth hitch). Option 2 with the single warp thread requires you to tie at both the top and bottom with a simple knot (takes more time, but you have a single thread).
Note, if you actually have a thick warp yarn, then it’s probably best not to double up, unless you really want the warp to stand out. Tension is key for each warp yarn; the extra length you added on gives you hanging strands that can be pulled on to regain your tension (you can cut them off once your piece is finished).


Images: 1. A rectangular branch loom warped up with double strands and a clove hitch; 2. A workshop participant weaving their loom made from chunky short branches; 3. A finished branch loom woven with grasses and dandelion stems; 4. A pair of finished branch looms large in size resting against a fallen log.
Traditional lap loom.
Small wooden looms can be purchased easily now, and provide an accessible way to take up weaving. The frames come pre-made with notches cut in, so all you need do is the warping and you’re ready to go. Tie your warp thread around the frame, move it in a snaking motion up and down catching it in the notches, and then snip your thread before tying at the other end.
Note, most pre-made looms will have thin notches so it’s unlikely you can use a yarn as thick as string for these.
When you have completed your weave, you ideally want to cut the piece off the loom so that you may use the loom again (plus it makes for easier display of the work). Some lap looms actually allow you to simply lift the work up and off, so avoiding cutting. With traditional lap looms, it is important that your warp tension is tight to avoid is flopping when you cut it. Whether you snip or lift the work off the loom, you’ll need to keep the warp threads steady, and this is where you see woven pieces displayed on small pieces of dowelling or branches.
It’s a very lovely idea for a gift or unique interior decoration.


Images: 1-2. A bought wooden lap loom warped with cotton perle thread and woven with dried and fresh grasses and wool roving; 3. Close-up of the finished lap loom piece; 4. The piece was cut off the loom and knotted onto a thin branch for hanging on the wall.
Experimental branch loom.
A bit less rigid than using a square or rectangular lap-style loom, this experimental variety will use any “funny-shaped” branch, such as one with a ‘v’ or a bend in it. It means that you decide where you warp up.
You could warp up as above, yet with funny-shaped branches it could be too time-consuming. Instead you can simply wrap yarn around your branch in a figure-of-eight. It does mean that you’ll likely have gaps next to the branch, especially if you have a chunky branch and thin warping yarn, so when you are weaving, be conscious of filling these in so materials don’t fall out.
Best for when you just want to experiment. Use a combination of thin and large stuff to make an unusual artwork.

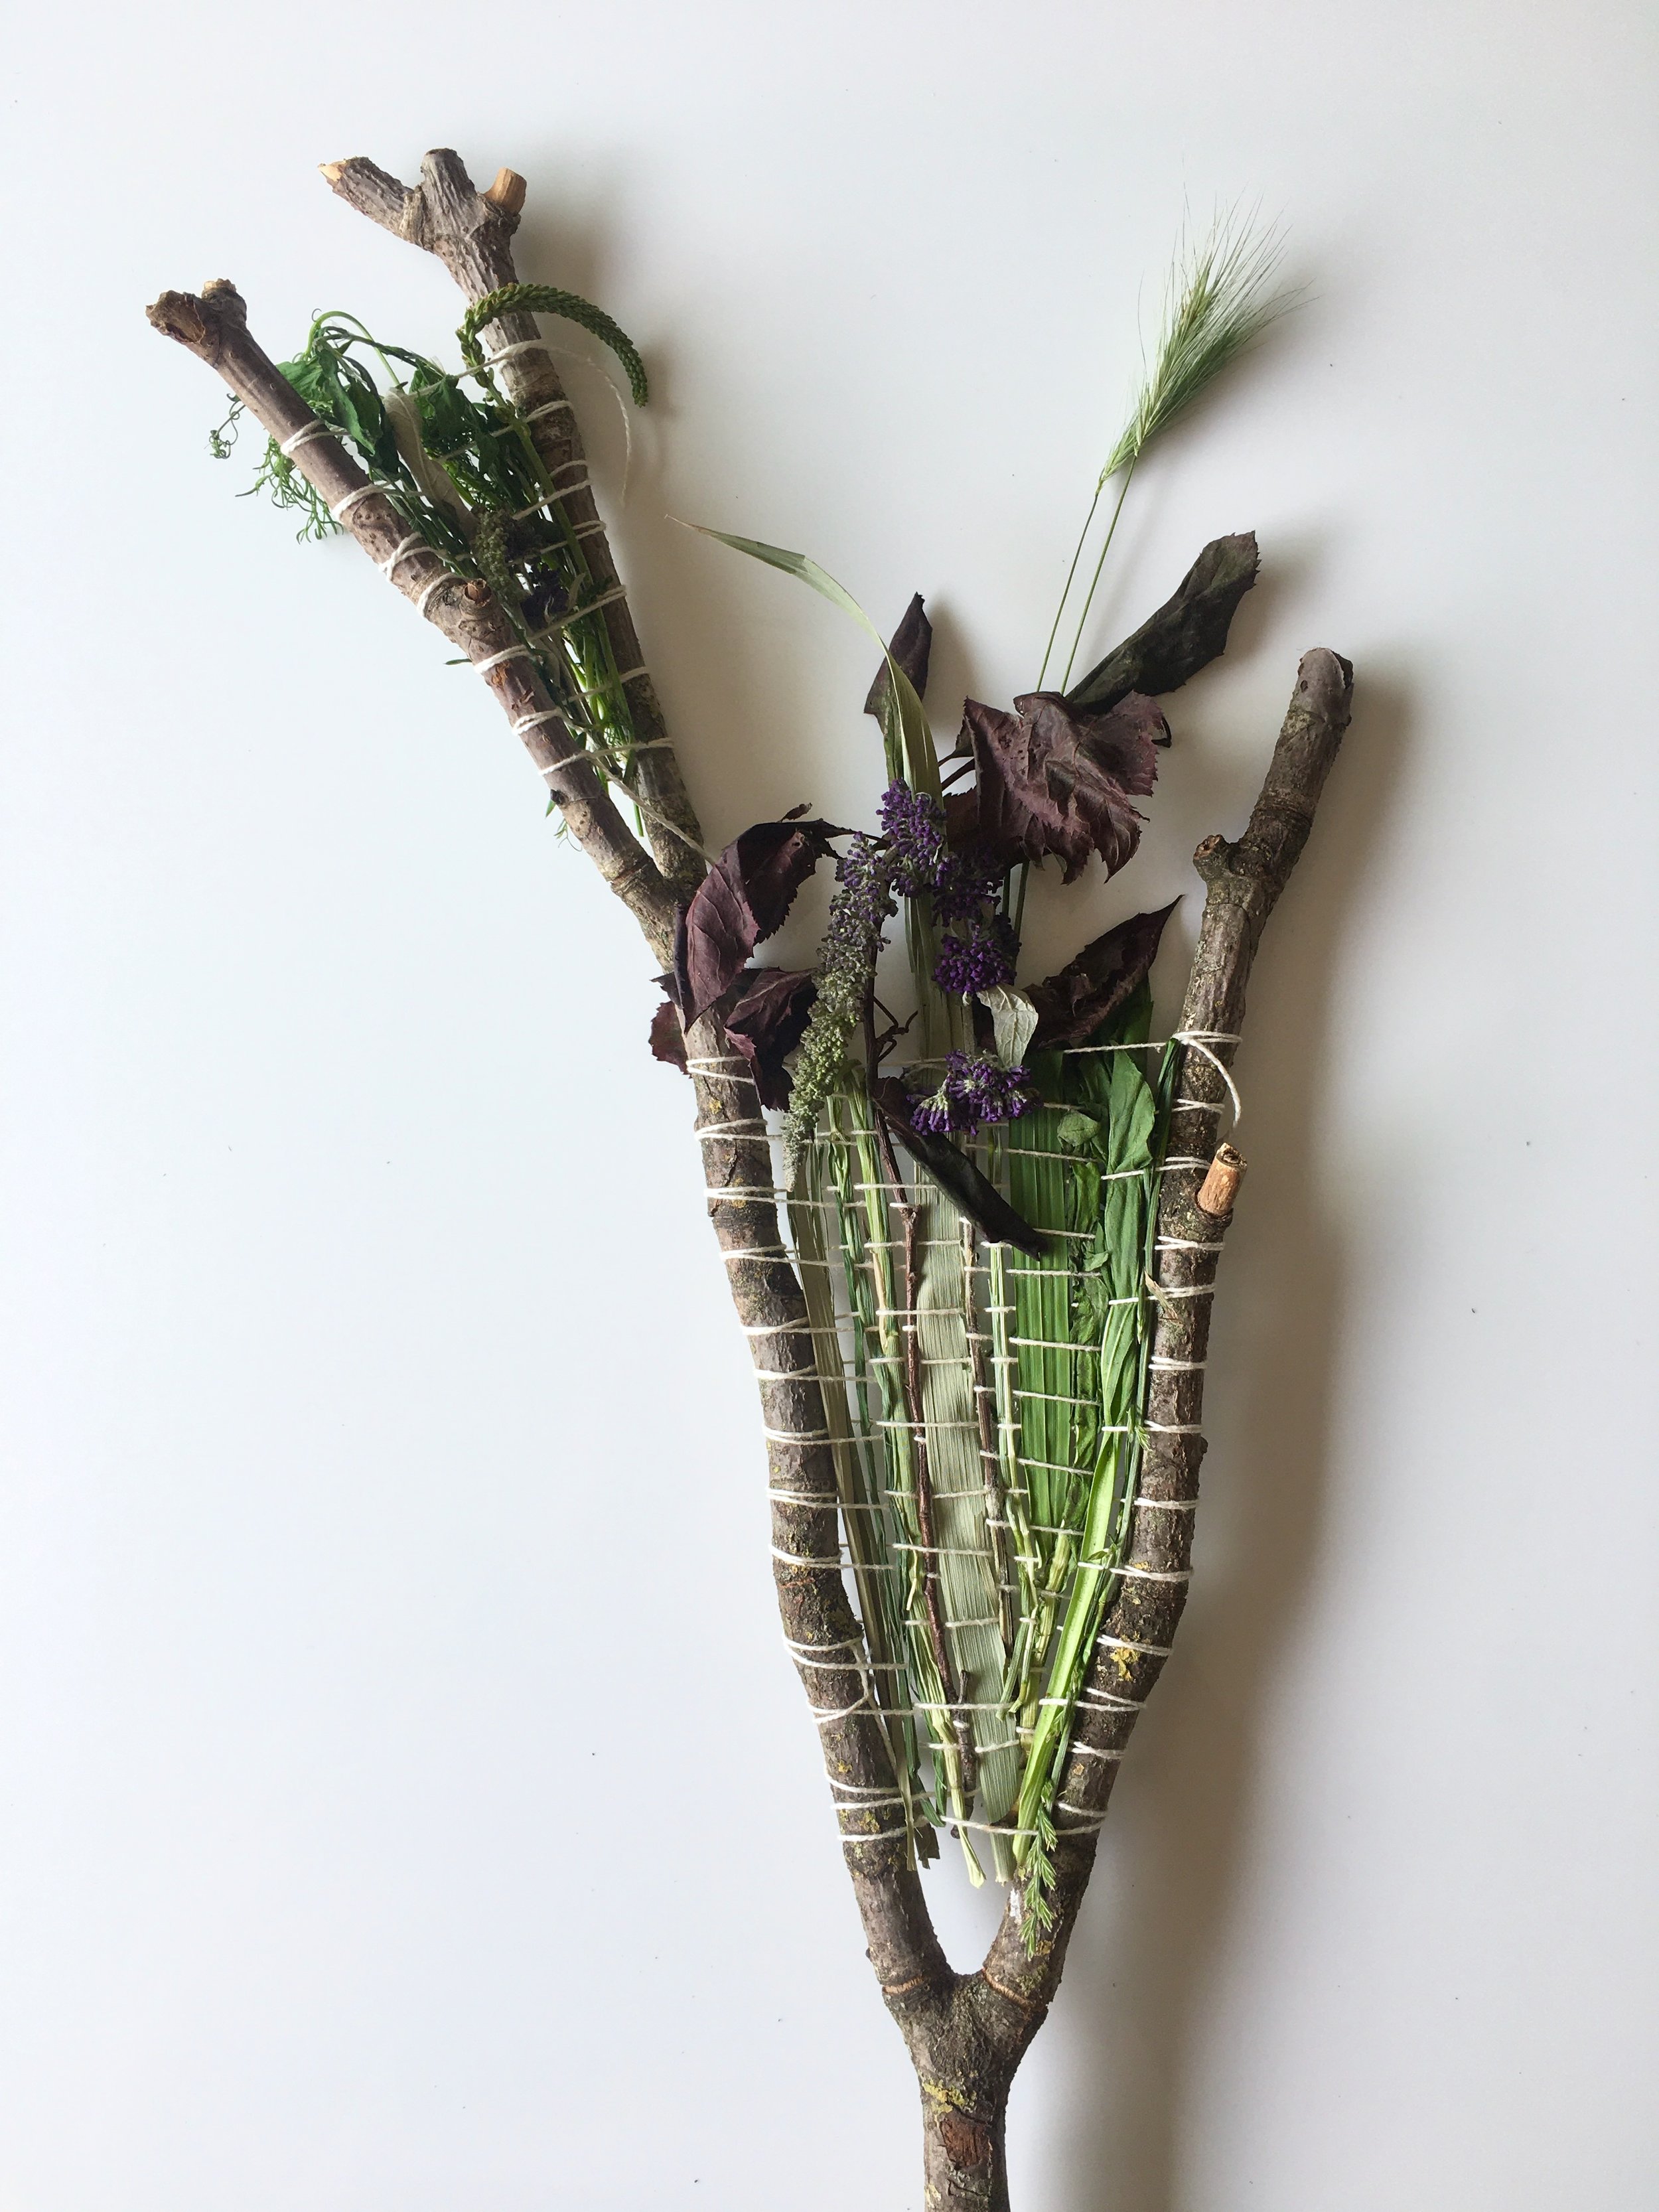


Images: 1-3. A foraged dead branch with two forks that was warped up using a figure-of-eight and then woven (quite trickily) with fresh and dried materials; 4. A workshop participants experimentation using driftwood, coloured yarn and dried grasses.
Rock weaving.
There are some absolutely superb rock weaving artists in the ether, who manage to keep the warp and weft so taut that the rock protrudes a feeling of perfection. This has never happened for me, though I have achieved some fine-looking pieces regardless of how tidy they are.
Taking hold of a rock you like, this will be your loom. You have to consider the size and texture; bigger equals more surface to play with, smoother equals a flatter weave and something more navigable. The simplest way to warp it is to tape one end of thread on the underside of your rock, then loop the thread around the rock, and then tape the other end. Taking a needle (you can also find flat bodkins) you’ll do your under-over-under-over pattern to build up a weft with your choice of yarn.
Most examples of rock weaving will have the rock as the nature component, while the warp and weft are traditional yarns, mostly because the warp itself provides stability on an unusual loom, and it’s easier to thread a weft onto a needle to pass through the tight warp. I’ve used paper yarn as my warp to provide the look of grass, while having a longer stronger piece of material.


Images: 1. Smooth oval-shaped rocks have been woven using fine-ish yarn to create something delicate against a heavy material; 2. In view are various materials and a couple woven rocks on a checked pink wool blanket; 3. Woven rocks are used as weights for an outdoor workshop to hold materials down.
How do you care for your artwork?
Anything woven with nature’s materials will fade and dry over time. Here are some considerations:
⇾ Keeping your work out of direct sunlight will prolong any pigments remaining in the plants.
⇾ If you really want to preserve the colour and shape of a flower, you could dip in or paint it with wax (quite a skill in itself) and allowed to dry before you weave it into the work.
⇾ Fresh materials will dry and shrivel, so taking up less room than when you wove with them. Your work will become somewhat more floppy and loose, so you could leave as is, or weave or poke in newer materials to bulk it back up.
⇾ Branch and lap looms can be displayed by hanging. Branch looms can additionally be propped up like a picture frame. Rock pieces would be displayed as an ornament. Self-warped looms would be stuck to a card or board for display or gifting.


Images: 1. A lap loom piece was snipped off the loom and tied around a branch to be hung on the wall using a simple picture-frame loop; 2. Workshop participants in a group hold up their finished branch loom pieces; 3. A community member decorates their cardboard loom with drawings.